

Published on
April 22, 2024
In the vast world of web server administration, security stands as a paramount concern. As data transmission between clients and servers becomes increasingly vital, ensuring its protection becomes non-negotiable. In this landscape, setting up a web server on a Linux distribution entails a fundamental task: ensuring the security of transmitted data. At the vanguard of this attempt, it is located the implementation of Transport Layer Security (TLS) encryption. For anyone involved in web development or hosting, mastering TLS encryption is not just a best practice but a foundational skill in safeguarding sensitive information exchanged over the web.
Introducing the second article in our sequence: Installing web servers on different Linux distributions where we will delve into the process of installing and configuring a high-performance lightweight reverse proxy/web server: "NGINX" to enable TLS encryption on popular operating systems such as Red Hat Enterprise Linux (RHEL), Debian and OpenSUSE.
This detailed guide provides clear and practical steps to implement an additional layer of security on your NGINX web servers, consequently ensuring the confidentiality and integrity of communication.
 Installing and configuring NGINX for TLS encryption on RHEL/Debian/OpenSUSE
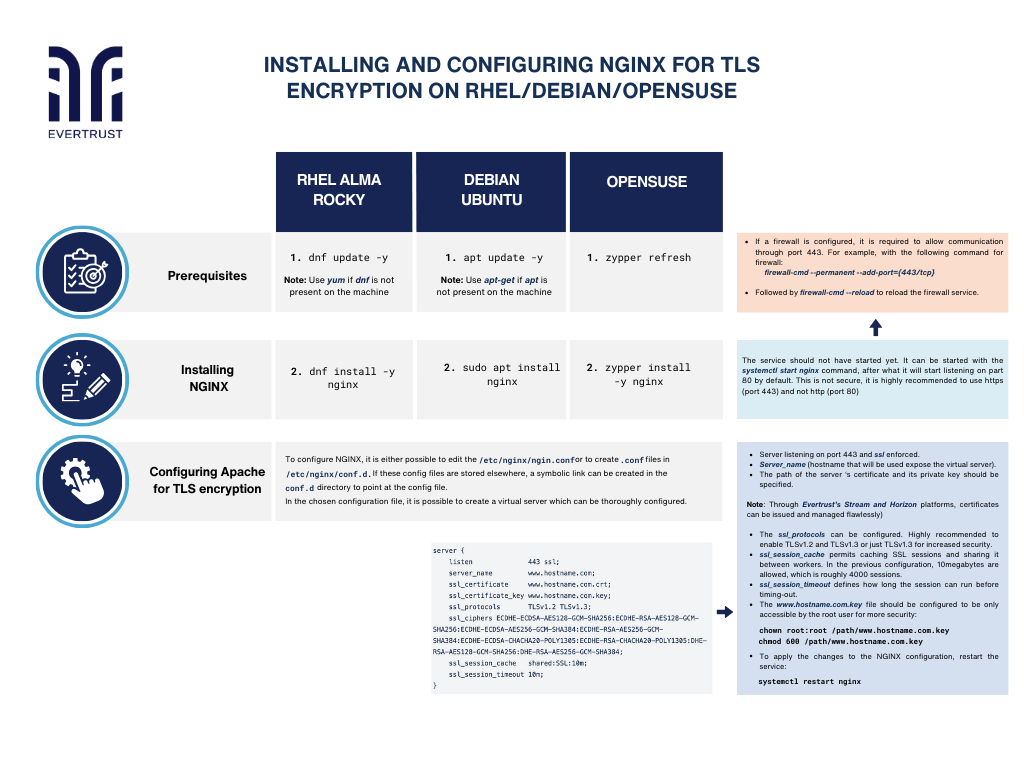
But before diving into the configuration process, it is essential to ensure that the following prerequisites are met:
Prerequisites:
Updating already present packages. Special privileges will be required for certain operations throughout the procedure:
RHEL
dnf update -y
Note: Use yum if dnf is not present on the machine
Ubuntu
apt update –y
Note: Use apt-get if apt is not present on the machine
OpenSUSE
zypper refresh
Stalling NGINX process:
Write the different commands for each system:
RHEL
dnf install -y nginx
Ubuntu
sudo apt install nginx
OpenSUSE
zypper install -y nginx
Note: The service should not have started yet. It can be started with the systemctl start nginx command, after what it will start listening on part 80 by default. This is not secure, it is highly recommended to use https (port 443) and not http (port 80).
Want to implement these PKI practices?
Get expert guidance on implementing secure PKI solutions for your organization.
Get Expert Help2. If a firewall is configured, it is required to allow communication through port 443. For example, with the following command for firewall:
firewall-cmd --permanent --add-port={443/tcp}
3. Finally to reload the firewall service:
firewall-cmd --reload
Configuring NGINX for TLS encryption:
To configure NGINX, it is either possible to edit the /etc/nginx/nginx.conf or to create .conf files in /etc/nginx/conf.d. If these config files are stored elsewhere, a symbolic link can be created in the conf.d directory to point at the config file.
In the chosen configuration file, it is possible to create a virtual server which can be thoroughly configured.
    server {
      listen              443 ssl;
      server_name         www.hostname.com;
      ssl_certificate     www.hostname.com.crt;
      ssl_certificate_key www.hostname.com.key;
      ssl_protocols       TLSv1.2 TLSv1.3;
      ssl_ciphers ECDHE-ECDSA-AES128-GCM-SHA256:ECDHE-RSA-AES128-GCM-SHA256:ECDHE-ECDSA-AES256-GCM-SHA384:ECDHE-RSA-AES256-GCM-SHA384:ECDHE-ECDSA-CHACHA20-POLY1305:ECDHE-RSA-CHACHA20-POLY1305:DHE-RSA-AES128-GCM-SHA256:DHE-RSA-AES256-GCM-SHA384;
      ssl_session_cache   shared:SSL:10m;
      ssl_session_timeout 10m;
    }
Notes:
The server should be listening on port 443 and ssl should be enforced.
Server_name is the hostname that will be used and will expose the virtual server.
The path of the server ‘s certificate and its private key should be specified. Through Evertrust’s Stream and Horizon platforms, certificates can be issued and managed flawlessly.
The ssl_protocols can be configured. It is highly recommended to only enable TLSv1.2 and TLSv1.3 or just TLSv1.3 for increased security.
The ssl_session_cache permits caching SSL sessions and sharing it between workers. In the previous configuration, 10megabytes are allowed, which is roughly 4000 sessions.
The ssl_session_timeout defines how long the session can run before timing-out.
The www.hostname.com.key file should be configured to be only accessible by the root user for more security:
chown root:root /path/www.hostname.com.key
chmod 600 /path/www.hostname.com.key
To apply the changes to the NGINX configuration, restart the service:
Test your NGINX configuration :
nginx -t
then
systemctl restart nginx
Conclusion:
In conclusion, installing a web server on a Linux distribution is a crucial step in setting up a web hosting environment whether you choose depends on your specific requirements and preferences, they offer robust features and performance optimizations for serving web content efficiently. By following the appropriate installation instructions for your chosen Linux distribution, you can quickly set up a reliable web server and start hosting your websites or applications for the world to access.